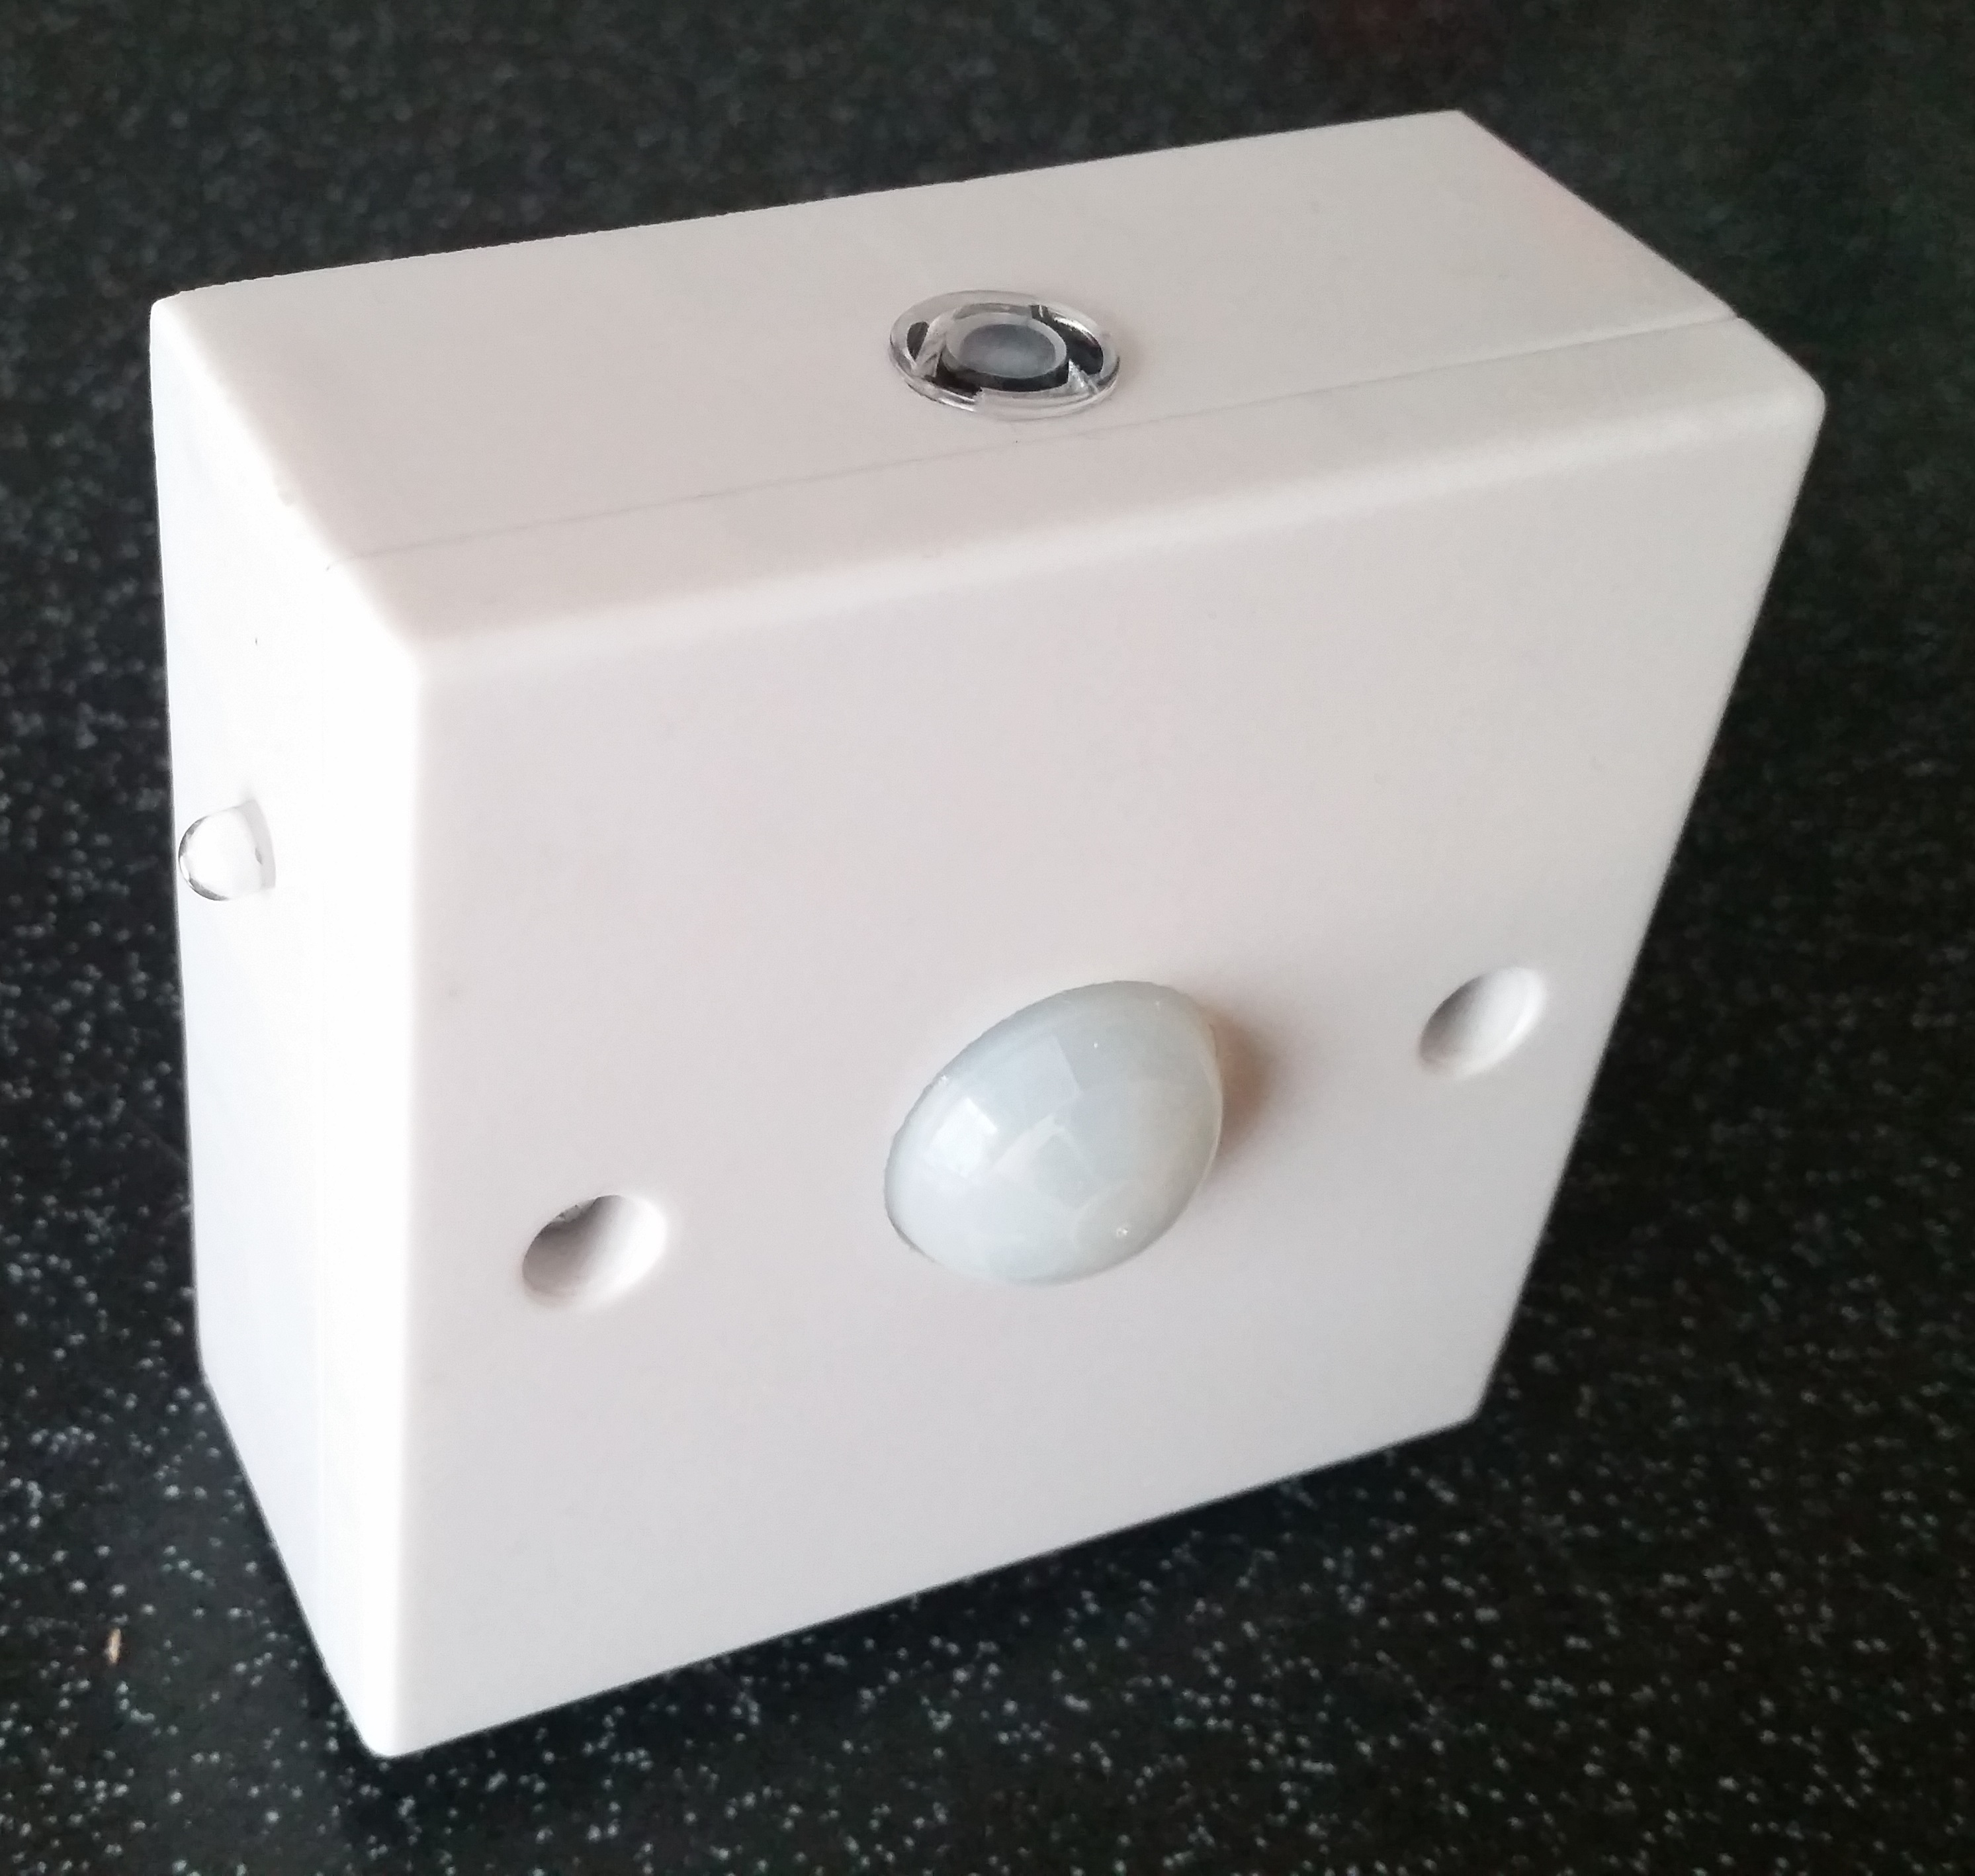
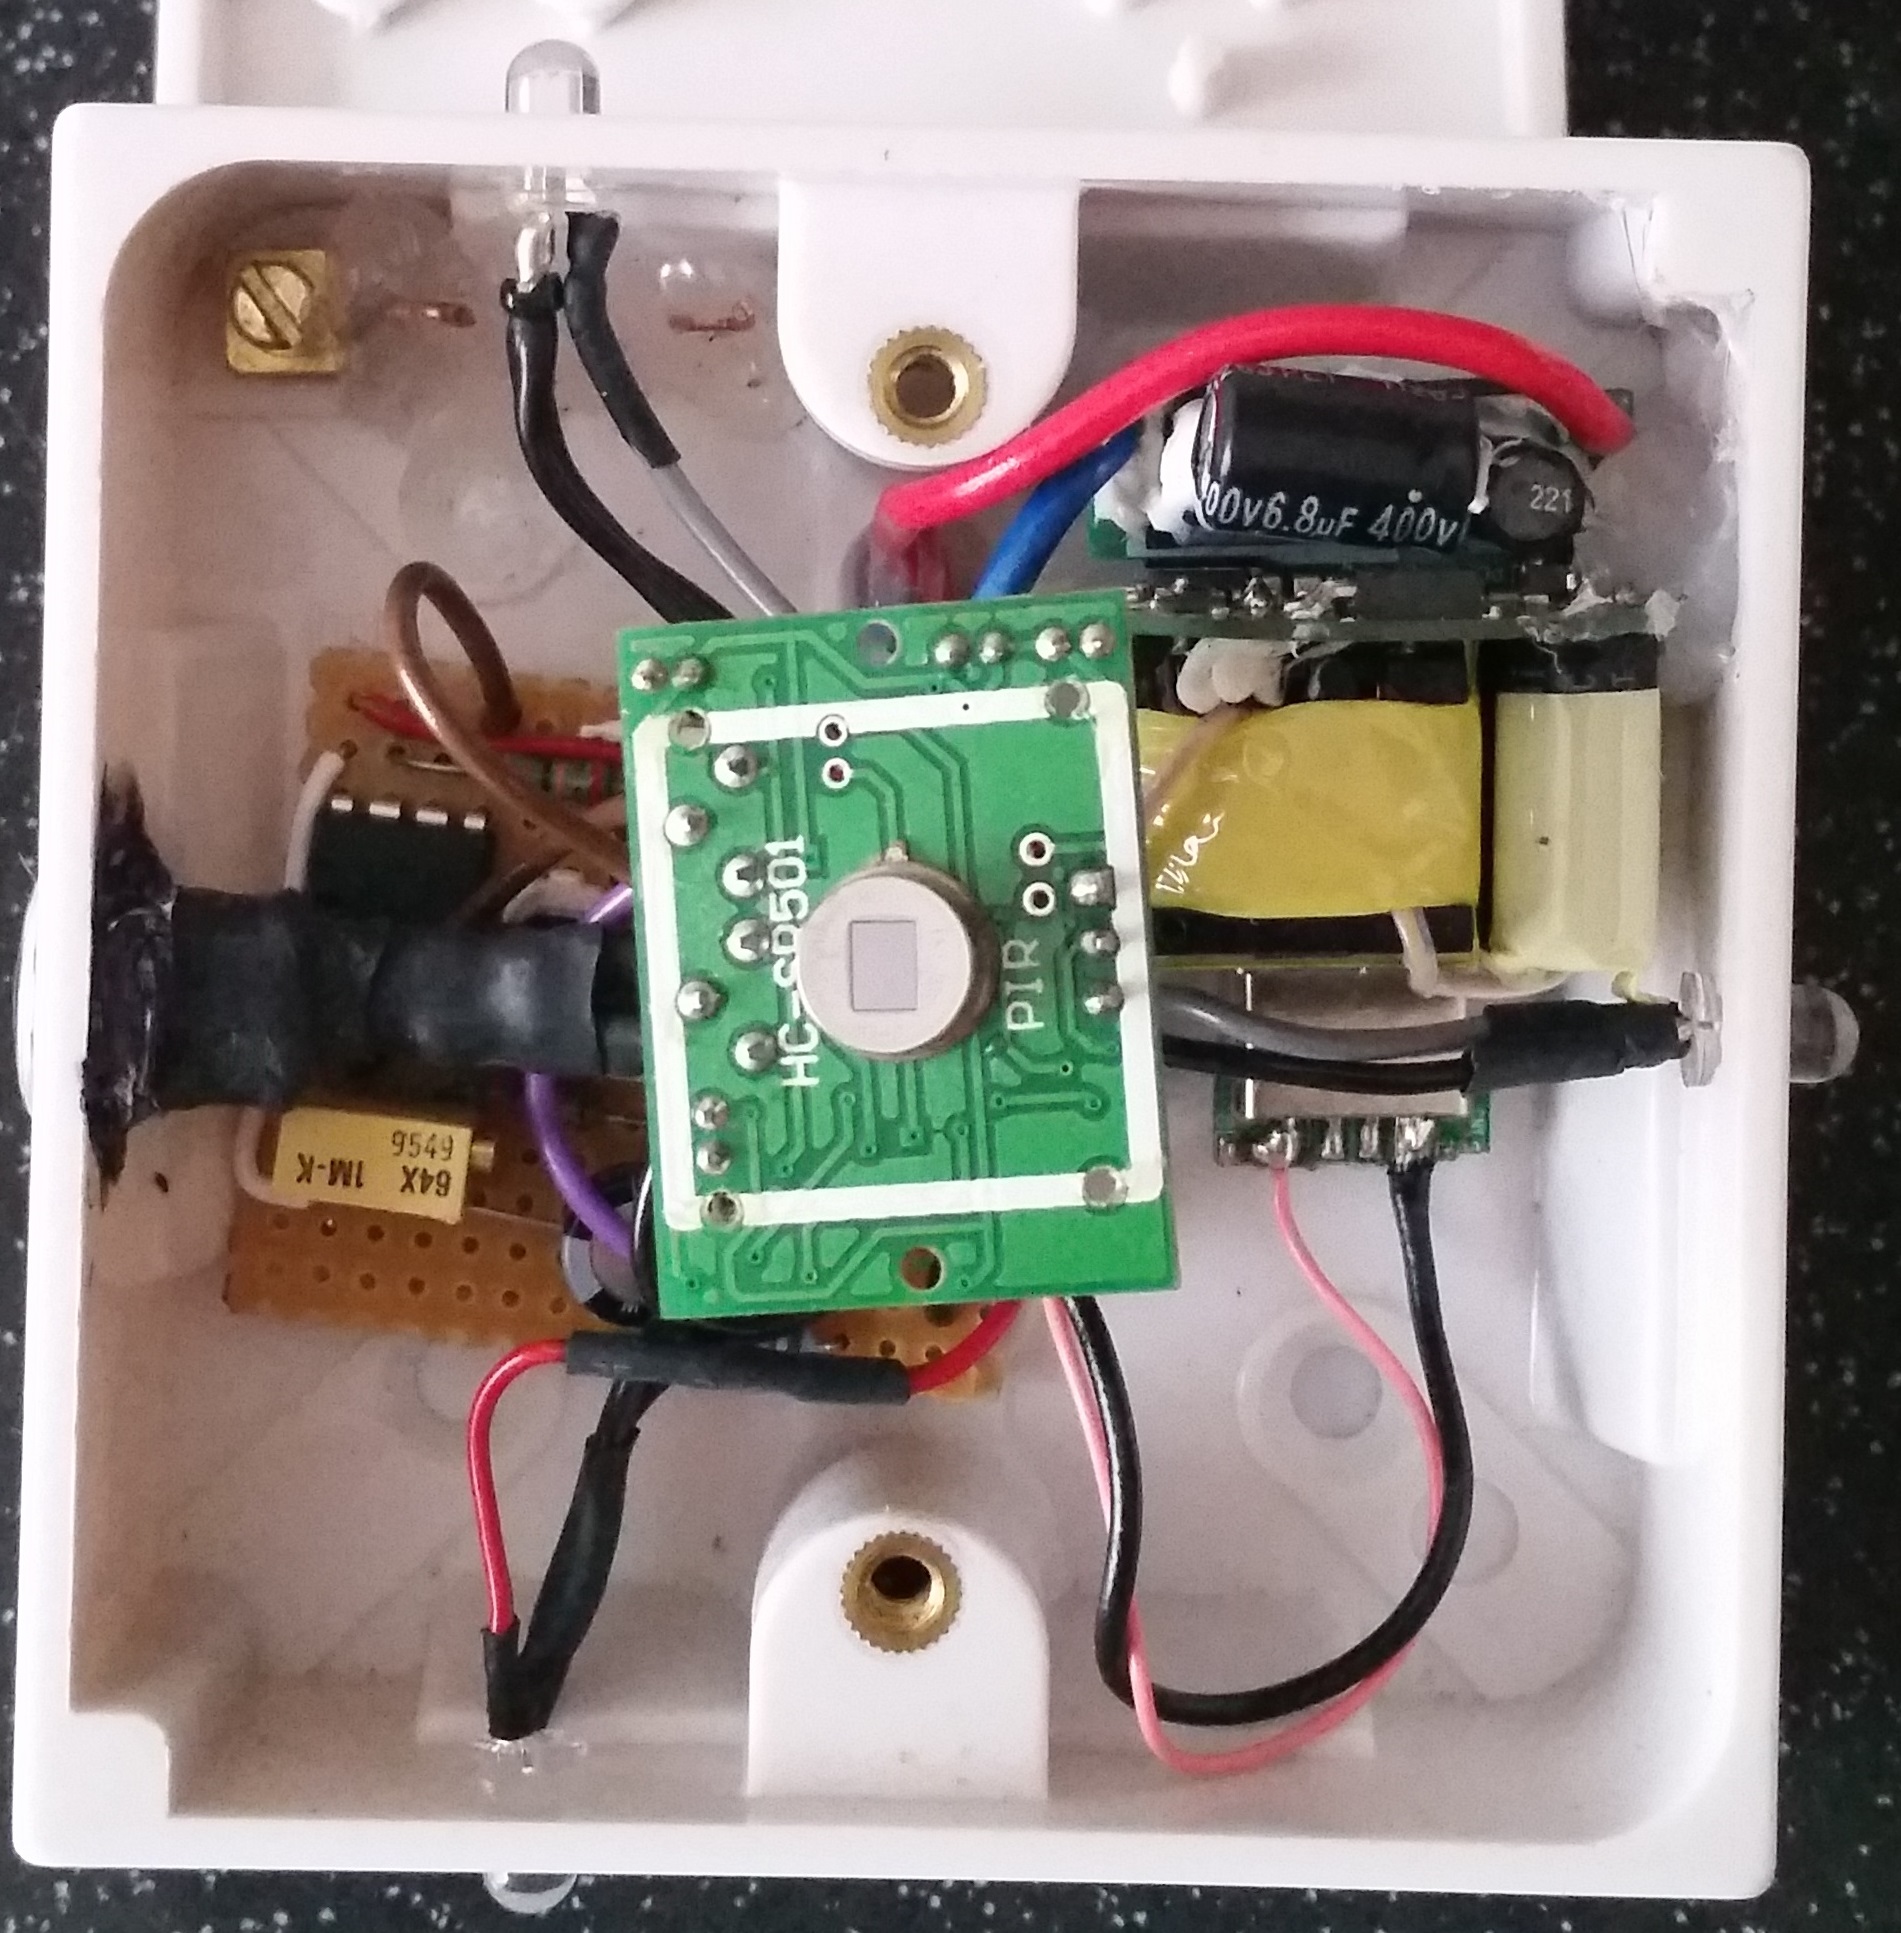
¶ Short description
Replicate functionality of an Arduino project using analog components to create a night light that's photosensitive and detects motion.
¶ A bit of history
Moved to a new place that has a corridor connecting all rooms but no natural lights so when all doors are shut, as it's usually the case for fire safety reasons, it's completely dark and also hard to find the light switches. I wanted to fit a night light that wouldn't be on all the time but also wouldn't be on when I have one of the doors open. My first prototype was based on Arduino Nano connecting three LEDs to three pins and using the analogwrite() function to dim the LEDs when they start up. For the motion detector I used a PIR sensor I bought some time ago and for the light detection I went for a photodiode instead of a light dependent resistor LDR. I had to reverse bias the photodiode and use an analog input on the Arduino Nano to detect when it was dark enough to turn the LEDs on. As for the power supply, I used a phone charger with USB output so that I can unplug and reprogram the Arduino as necessary. It does the job quite nicely and it has been working for three months but...
¶ You could do that with a 555
It's one of the comments that most electronic hackers would make when such simple functionality is required. Indeed, it can be done with a 555, triggered with the two conditions of low light level and motion detection and driving some sort of transistor in case the power required by the LEDs was higher than what the 555 can supply.
¶ What's a 555? And also, is that the right device for the application?
A 555 is basically a timer. It can work as a monostable and astable multivibrator. In plain words: it generates a voltage output that can be maintained for a variable time, can be triggered multiple times and can also be retriggered automatically thus generating a square wave signal (astable configuration). To change the different time constants only a capacitor and a couple of resistors are required so it's quite simple to implement.
I was using the analog output from the Arduino in a similar manner as the 555 could be configured to drive the LEDs but to achieve the same variation of duty cycles on the square wave I would have to change the capacitance or the resistors and that just complicates things. But, how complicated is 'complicated'? What am I trying to do exactly?
¶ Designing an analog circuit from scratch
I use microcontrollers for pretty much every single project, no matter how big or small, and I don't care much about the efficiency of the result as I'm usually going for mains powered solutions. That doesn't mean that I'm not aware of the implications in terms of energy use and cost of components. Yeah, Arduino boards are super cheap and unless you want to run on battery power they don't use much energy but still, could I do better? The first idea was to put the Arduino to sleep with an interrupt but the voltage regulator would still be running so it doesn't really make a huge difference. I'm not the first one to consider this issue (Arduino Low Power).
So, as a challenge, I decided to improve the power consumption and remove the Arduino while keeping the functionality. To do so I would have to use analog circuits and perhaps a logic gate, and if that was the case then it would be my first fully analog circuit. I know the basics but I've been more of an integrator than a designer so perhaps it's a good excuse to follow some methodology that will help reduce the developing time:
- Describe the functionality and generate a logic diagram
- Split the functionality into different blocks that can be tested individually
- Select the components that are required for each block
- Simulate each block
- Build the circuit on a protoboard and test functions individually
- Integrate and stress-test all of them in one circuit
- Generate a PCB layout
- Solder the components and build the prototype
- Write things down on every step!!!
¶ First stage: Functionality
Started with writing down the way it should operate:
- Light turns on when it's dark enough and it detects movement
- It stays on for a certain time
- Can be retriggered if it detects continous movement
- It has soft start around two seconds from zero to full brightness
- It needs to be able to drive three LEDs
- Low power consumption when idle
- Powered from a mains socket
- It has to be small enough and look good when finished
Breaking down the functionality into chunks:
- Motion sensor
- Retriggering
- Light sensor
- Comparator
- AND gate
- Timer
- LED driver
- Soft start filter
- LEDs
- Power supply
- Enclosure
- Plug
In order to select the components I had a look at the box of bits that I've been collecting over time. I started with an individual op-amp and realised that the voltage and current provided by the motion sensor were insufcient to operate the AND gate properly. I tried a few configurations until I found one that worked:
- Motion sensor, timer and retriggering -> PIR motion sensor HC-SR501
- Light sensor -> Photodiode
- Comparator -> Dual operational amplifier MCP6042
- AND gate -> Two BC639 NPN bipolar transistors in series
- LED driver -> One BC639 transistor
- Soft start filter -> RC network with 200uF electrolitic capacitor and 10k potentiometer
- LEDs -> Three 5mm high brightness white LEDs
- Power supply -> Hewlett Packard LPS AC/DC Adaptor P/N 157-10157-00
- Enclosure -> UK single gang surface mount back box 86 x 86 x 32mm
- Plug -> Flat three pin UK plug (front of a standard plug trimmed to be as flat as possible)
- Auxiliary -> Wires and resistors
¶ Second stage: Simulation
Before I started putting everything together I wanted to be sure that the setup was correct so I used a circuit simulator to check the values of the resistors needed. In order to do that I splitted the functions into different circuits and tested each one individually to get more familiar with them:
- LED driver and soft starter
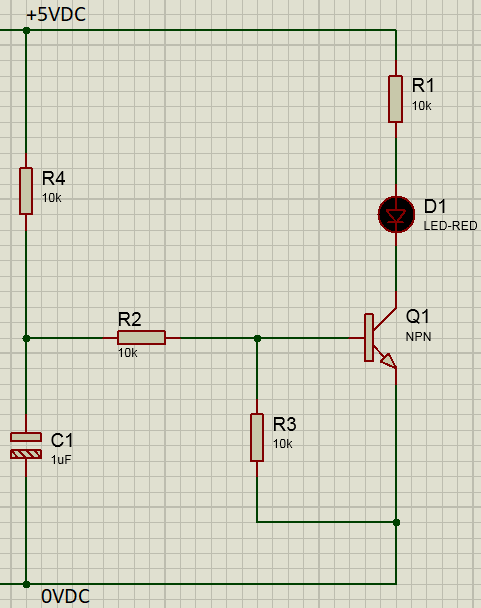
When initially applying 5VDC the capacitor C1 starts charging through R4 and almost no current will flow through R2. The initial voltage on the positive terminal of the capacitor would be zero and it starts increasing at a rate that depends on the values of R4 and C1. As the voltage in the common node increases also does the voltage on the gate of the transistor Q1 (very small current through R2 means very small voltage drop across). Some of the current also flows through R2 and R3 operating as a voltage divider. As the capacitor charges the current through R4 goes down and so does the voltage drop, increasing the voltage on R2 which in turn will increase the voltage on the gate for Q1. When the voltage is sufficient Q1 will allow current to flow from the collector to the emitter and the LED will illuminate through the current limiting resistor R1. As the capacitor charges, the voltage on the base will be higher, the current from base to emitter will increase and the LED will shine brighter. For switching off, after removing power the capacitor will discharge through R2 and R3 but it will still provide current to discharge through R4, R1 and D1 until the current in the gate of Q1 turns the LED off. By chosing the values of all these components it's possible to simulate what the response time would be for the soft start/soft stop of the LED. In my case I had access to Proteus PCB Designer which includes a simulator so I could both build the schematic and test its behaviour.
-
Op-amp as a comparator
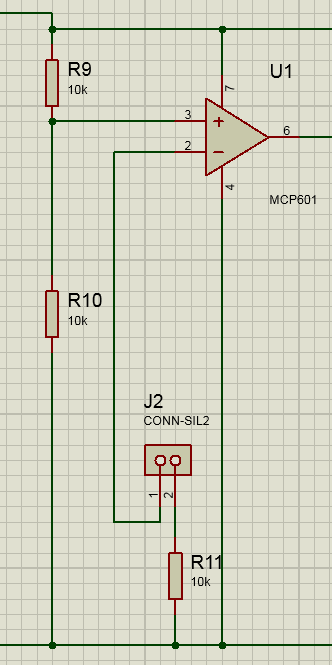
One of the multiple applications of an operational amplifier is working as a voltage comparator. In this configuration the op-amp works in saturated mode so it's output will change quickly from the positive supply rail voltage to the negative or ground voltage depending on whether the inverting input's voltage is higher or lower than the non-inverting input's voltage. In other words, looking at the schematic, if the voltage in terminal 3 is higher than the voltage in terminal 2, the voltage in terminal 6 will be the same voltage of terminal 7, but if the opposite happens then terminal 6's voltage will be that of terminal 4. In this case I'm using a rail-to-rail op-amp which makes this statement correct but other op-amps will have a small voltage drop and might not necessarily reach the rail voltages, either one or none of them. Connector J2 is the externally connected photodiode in photovoltaic mode with R11 as loading resistor. By adjusting the values of R9 and R10 I was able to simulate the different voltages at which I could make the op-amp trigger its output depending on the amount of light and the voltage created by the photodiode. -
AND gate with two NPN transistors
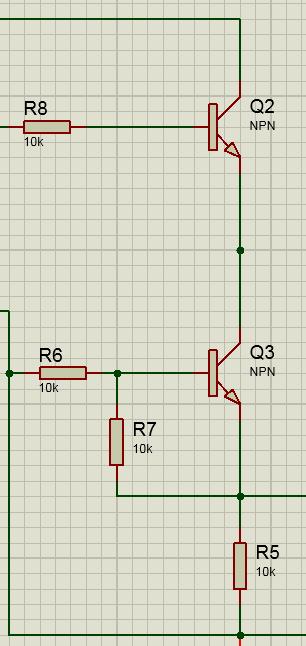 In this configuration both transistors have to be conducting for the emitter of Q3 to provide an output that's then sent to the LED soft starter. One of the conditions is the current through R8 that depends on the voltage output of the op-amp. The second condition is the PIR motion sensor output switching on when motion is detected. Resistor R7 is there to discharge quickly the gate of Q3 once the PIR output switches off.
 -
Full schematic
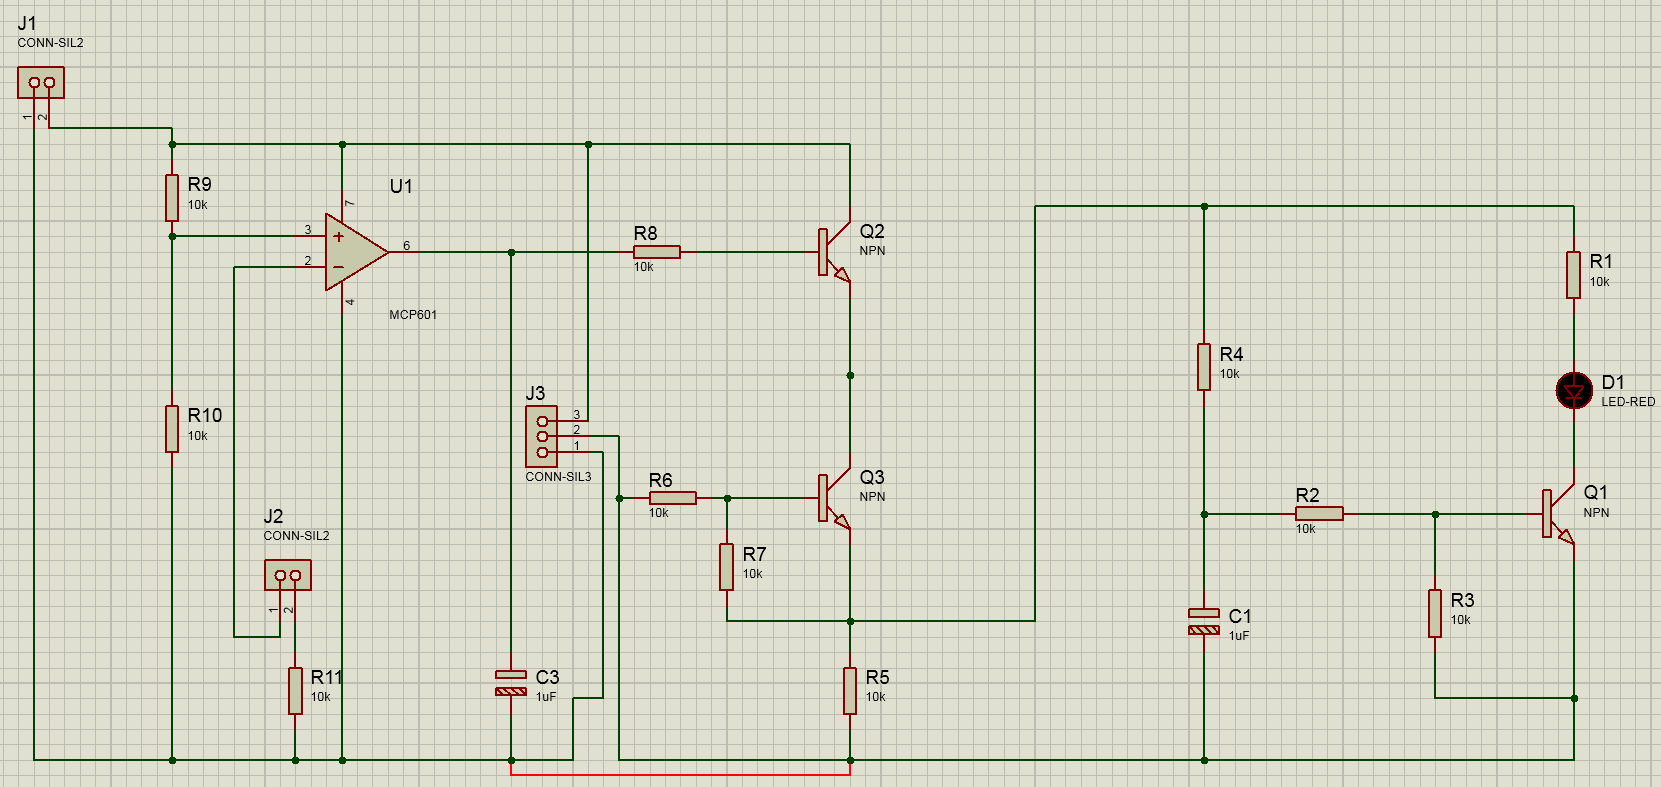
¶ Third stage: PCB Layout
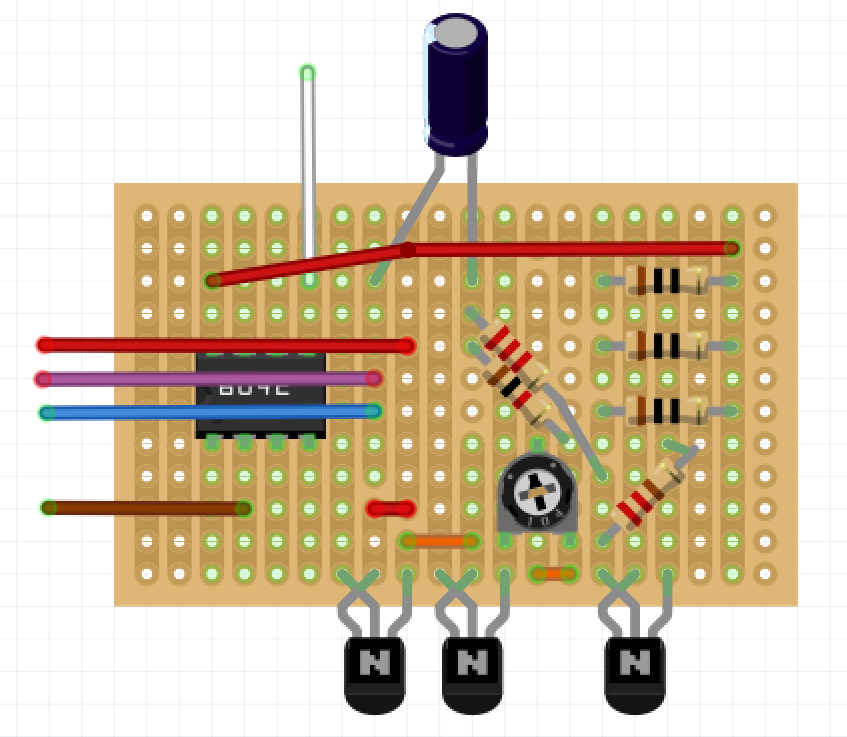
Once I was happy with the results of the simulation I moved on to building a prototype. Since I was confident at that point that the results would work, instead of building the circuit on a protoboard I went straigth into a prototyping PCB and from there I wanted to use it directly inside the enclosure I had already built so it had to be as compact as possible. Although Proteus has a built-in PCB layout program called Ares I haven't used it for over ten years. I thought that Fritzing was more user friendly for what I wanted to do so I started playing with it, trying to squeeze every single pin and cutting the necessary tracks to make it small. The result is on the picture.
¶ Final stage: Soldering and testing
Once I had all the components layed out in Fritzing I moved onto building the board and soldering them. Unfortunately, some of the components at hand didn't have the exact same model so after a little tweaking I managed to get a functioning board and I was able to test the results. One caveat was the potentiometer used to set the level of light which ended up being a multiturn version instead of the one depicted. I also found a minor issue when the amount of light is low enough to trigger the op-amp but not so low that when the LEDs turn on the light the provide added to the ambient light make the op-amp switch off. To avoid this I added a hysteresis resistor from terminal 6 to terminal 3 of U1. By doing so, once the light level on the photodiode is smaller than that of the voltage divider (which I can adjust with the potentiometer I've just described) it will trigger the op-amp's output high which will add extra voltage in the form of a pull-up resistor to terminal 3. In that situation there has to be a lot more ambient light to make the op-amp swith off and the LEDs turning on would not be sufficient.
¶ Result
